The world of crafting has been wonderfully upgraded by the introduction of foil finishes, and Foil Direct offers a range of plotterfolie ↗ that can bring a professional, metallic shine to your projects. However, with several options available, selecting the perfect film can feel overwhelming. The key to a successful project lies not just in the application technique, but in choosing the right type of film from the start. By understanding a few core principles about your project's needs, you can confidently navigate the selection process and ensure your crafted items shine brilliantly and last.
Start with Your Project's Core Material
The very first question to ask is: what surface are you applying the foil to? The answer to this will heavily influence your choice. Foil Direct films are engineered with specific adhesives tailored to different materials. For common crafting substrates like cardstock, paper, and matte-finish plastics, a standard permanent adhesive film is often perfect. However, if you’re working with more delicate materials like untreated wood, which has a porous surface, or certain fabrics, you’ll need a film with a stronger, more aggressive adhesive to ensure a lasting bond. Conversely, for projects that are temporary, such as seasonal decorations, a removable adhesive film would be the wisest choice to avoid damage upon removal.
 ### Envision the Final Look: Finish and Effect
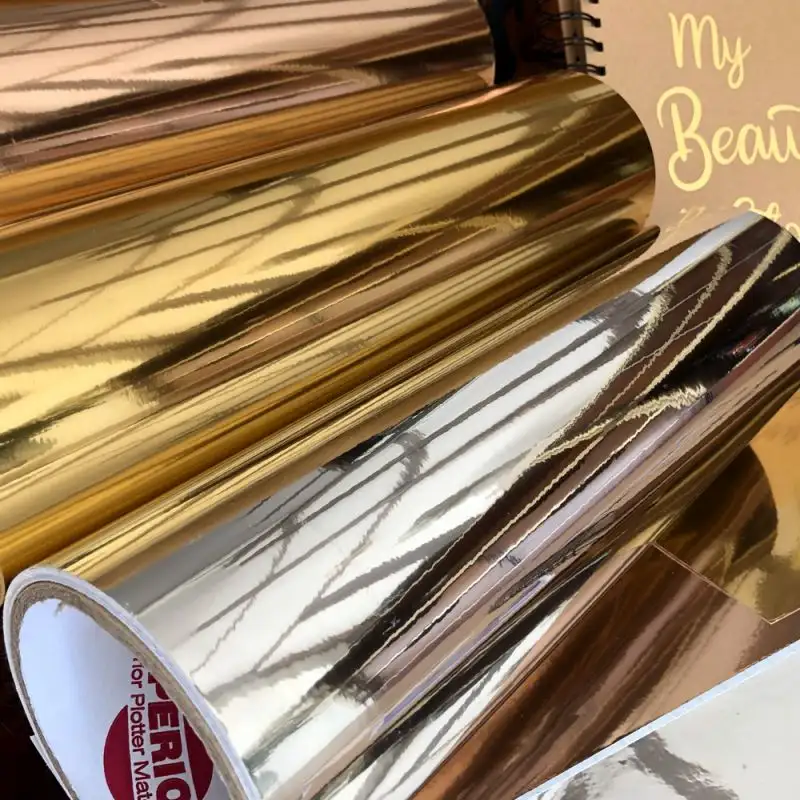
Once you know your material, the fun part begins—choosing the visual effect. Foil Direct provides a dazzling array of finishes that go far beyond basic gold and silver. Ask yourself what emotion or style you want to convey. Is it the classic elegance of a mirror-like gloss for wedding invitations? Or the modern, subtle sophistication of a brushed metal effect for personalized coasters? Perhaps your project calls for the vibrant pop of a pigment foil in rose gold or cobalt blue for custom stickers. For party decorations or trendy tumblers, a holographic or patterned film can create an unforgettable, dynamic look. Browsing the options with your specific project in mind will lead you to the perfect aesthetic.
Understand the Critical Role of the Carrier Sheet
A component often overlooked by new crafters is the carrier sheet—the clear or paper-backed sheet that holds the foil layer. This is a critical part of the user experience. Clear or translucent polyester carriers are excellent for precision placement, as they allow you to see exactly where your design will land on your project. This is invaluable for aligning text or intricate patterns. Paper-backed carriers, while sometimes less transparent, can be easier to handle and load into certain cutting machines. Considering how you will position your design can help you decide which carrier sheet type will make your workflow smoother and more accurate.
Decide Between Hot and Cold Peel for Your Workflow
The method of removing the carrier sheet after pressing is a crucial technical choice. Foil Direct offers both hot-peel and cold-peel films, and each creates a different final effect. Hot-peel films are removed immediately after the heat press cycle, while the material is still warm. This typically results in a super high-gloss, reflective finish. Cold-peel films, on the other hand, must be allowed to cool completely before the carrier is peeled away. This process yields a sophisticated matte or satin foil finish that is also more durable and resistant to cracking over time, making it ideal for items that will be handled frequently, like keychains or bookmarks.
The Non-Negotiable Step: Testing and Sampling
Even with all the right knowledge, the unique combination of your specific heat press, cutter settings, and material can lead to unexpected results. This makes testing an absolutely non-negotiable step. Before committing to your final project, always run a test cut and application on an exact scrap of your project material. This small investment of time and material will allow you to verify that your blade depth is correct, your heat press settings are optimal, and the adhesive bonds perfectly. A test run confirms you love the look and feel, ensuring your final crafted item turns out exactly as you envisioned, without costly wasted materials.
 ### Matching Your Tools to the Film Selection
Finally, your choice of film should be compatible with the crafting tools you own. While many Foil Direct films are designed for use with standard craft cutters, it’s always prudent to check the film’s specifications for recommended cutting settings. Ensure your machine can handle the thickness of the film and carrier sheet combination. Additionally, verify that your heat press or mini press can consistently achieve and maintain the temperature required for the specific film you’ve chosen. Using tools that are well-matched to your material ensures a clean cut, a strong bond, and a frustration-free crafting experience from start to finish.
Bringing Your Creative Vision to Life
Choosing the right Foil Direct plotter film ultimately comes down to a blend of practical consideration and creative vision. By systematically evaluating your project's material, desired aesthetic, and application workflow, you move from guessing to knowing. This informed approach empowers you to use these fantastic materials to their full potential, transforming ordinary craft projects into extraordinary, professional-looking pieces. Whether you're personalizing gifts, creating home decor, or building a small business, the right film is the key to unlocking a world of brilliant, durable, and captivating foil creations.